This is a necklace, that was in desperate need for a name.:( I wore it to work last week, hoping someone would help me name her. When I arrived at work, I new I had my name. Tricia was working and that name it just fit. I always think of wood jewelry as warm, earthy, honest and unique, all of which describe this person to a tee. So I dub thee, the Tricia Necklace. Tricia, you have been a wonderful friend and even though we don't see each other very much, I feel Like I have known you for a lifetime.
Thank you so much, for your friendship.
Tutorial
Things You Need.
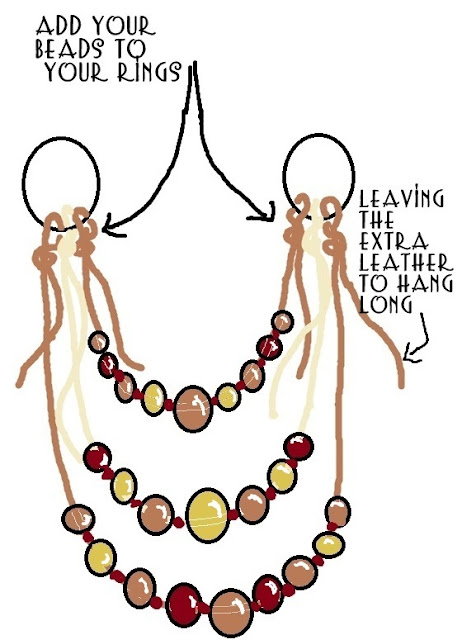
1. Measure out 3 leather pieces, Gradually making each one longer. ( set out my beads in the pattern I want before I string them.)
2. String your beads, tying a knot in between each bead.
3. Add your beads to the rings, leaving your left over leather long, don't cut it off.4. Fold two , 6 inch, leather pieces in half and slid them through two beads, of your choice, then attach a jump ring so you can attach it to the bigger ring.~Like the picture above.~ Slide your feather up into the bead( I did not glue my feather because it was a tight fit, but that is not a bad idea to do.)
5. Fold your cords in half and tie each one to each the ring~ this will be how you tie it around your neck.
6. Add beads to the rest of the longer leather pieces.
And with that, you are done!
<3
Anne


So pretty! You just made my morning! It's 9AM, I'm at the office and I need coffee! HAHAHA! Have a great day!! xox
ReplyDelete-Wynn
http://wynn-notetoself.blogspot.com/
You're a genius! Wonderful! :)
ReplyDeleteThis is sooo beautiful!! I love feathers!!!
ReplyDeleteYou have a unique style my dear! :)
ReplyDeleteCuuuuuuuuuuuuuuuuuuuuuute
ReplyDeleteI love the creative people like you, dear Anne.:)
ReplyDeleteThat is sooo cute! I love it..
ReplyDeleteLove this, you must have the best wardrobe / jewellery box around!!
ReplyDeleteSadie x
http://whatsadiedid.blogspot.com/
your blog keeps getting better and better. wow.
ReplyDeletelove.
I want your accessories closet. you'd laugh if you saw how minimal my now is...time to get my craft on, eh?
aaaaaanne help lol,How did you tie the back?
ReplyDeleteis it 2 parts tied in a bow or knot?
So pretty! What a great tutorial!! I am visiting from Somewhat Simple and I would LOVE if you would kindly link up this awesome idea to my very FIRST Delicately Constructed Fridays; a crafty linky party that starts tomorrow!
ReplyDeletePlease :)
Have a great day!!
Michelle
www.delicateconstruction.blogspot.com
Anne, thats an amazing necklace and the tutorial is amazing :)
ReplyDeletethanks for sharing
hugs
Manni
www.ibakecakes.ca
What a pretty necklace - your tutorial is great! I stopped by from The Sundae Scoop, I've posted a project there too!
ReplyDeleteHugs, antonella :-)
http://quilling.blogspot.com/2011/05/wacky-wednesday-hug-card.html
I absolutely LOVE this one!
ReplyDeleteHow do you tie the back without it being clumpy?
ReplyDeleteI just tied it in a knot..:)
Delete